TL;DR
A closet rig isn’t about perfect soundproofing—it’s about controlling echo and reflections. Moving your setup out of your main space, using correct placement, and adding targeted treatment makes a huge difference. Ventilation and careful treatment are key for both sound quality and equipment safety.
Ever felt frustrated by the constant hum or echo from your home studio, yet hesitant to invest in expensive soundproofing? Here’s the truth: the most effective way to quiet your workspace isn’t fancy foam or sealing every crack. It’s about where you put your gear and how you treat the space around it.
This guide cuts through the noise—literally. You’ll learn how to position your microphone, what materials work best, and how to keep your rig cool when tucked away in a closet or cabinet. Whether you’re recording vocals, streaming, or running AI models, these tips will help tame the chaos and give you cleaner sound, with less stress on your equipment.
Acoustic dampening
& the rig in the closet.
The most powerful noise fix isn’t a material — it’s a floor plan. A rig you can’t hear because it’s in another room beats any amount of foam. Tap the approaches in Part 1 to see what actually works.
(another room)
(levers 1–4)
(door / barrier)
(acoustic foam)
Contain the noise, not the heat
Key Takeaways
- Placement is more effective than foam or barriers for reducing echo in small spaces.
- Treat the main reflection points—walls, ceiling, and door—before adding more treatment materials.
- In tight spaces, addressing low-frequency buildup with bass traps prevents a dull, boxy sound.
- Ventilation isn’t optional—proper airflow keeps your rig cool and quiet in a closet setup.
- A ‘rig in the closet’ works best when combined with strategic placement, targeted treatment, and good airflow.
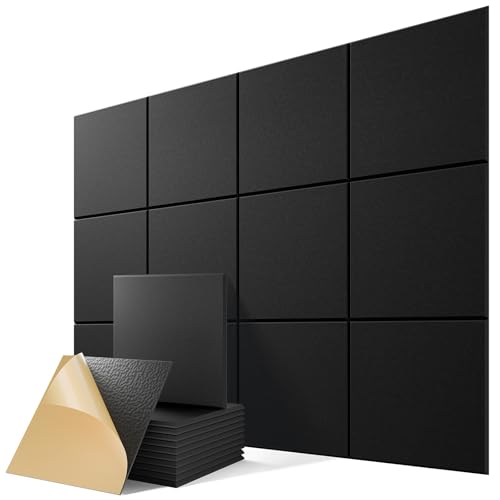
12 Pack Self-Adhesive Acoustic Panels, 12" X 12" X 0.4" High-Density Sound Proof Foam Panels for Walls, Soundproof Wall Panels for Home & Office (Black)
- Effective Noise and Echo Reduction: Absorbs noise and minimizes reverberation
- Easy Peel & Stick Installation: Quick DIY setup without tools
- High-Density Acoustic Foam: Engineered for superior sound absorption
As an affiliate, we earn on qualifying purchases.
As an affiliate, we earn on qualifying purchases.
Why Placement Trumps Acoustic Foam Every Time
Placement is king. Before you buy a wall of foam, ask yourself: where are my reflection points? The main goal is to position your mic and equipment so that sound waves don’t bounce straight back or create echo. This is where acoustic treatment can make a big difference.
Imagine you’re recording vocals in a tiny closet. The first reflection points are typically the wall behind you and the ceiling. Moving your mic away from these, or angling it differently, can cut reverb by 50% without a single foam panel.
Think about a real scenario: you’re sitting in front of a small desk, mic angled slightly downward, with the wall behind covered with a thick blanket. Suddenly, your voice sounds warmer and less echoey—because you’ve manipulated where the sound hits and bounces.

Focusound 52 Pack Acoustic Foam Panels 1" x 12" x 12" Sound Proof Foam Panles Soundproofing Noise Cancelling Wedge Panels for Home Office Recoding Studio with 300PCS Double-Side Adhesive
- Soundproofing Design: Triangular grooves for noise absorption
- Includes Adhesive Tape: 300pcs double-sided adhesive for easy installation
- Easy Shape Recovery: Reforms after soaking in water
As an affiliate, we earn on qualifying purchases.
As an affiliate, we earn on qualifying purchases.
The Real Difference Between Soundproofing and Acoustic Treatment
Soundproofing and acoustic treatment are often confused but serve different purposes. Soundproofing blocks sound from leaving or entering a space—think sealed doors, dense drywall. Acoustic treatment, on the other hand, manages sound inside the space—reducing echo and reflections. Understanding these differences helps you prioritize your efforts.
In a closet rig, you’re usually not making it soundproof; you’re controlling reverb and harsh reflections. For example, adding thick blankets and foam panels reduces echo but won't stop loud neighbors or street noise. Conversely, sealing gaps around the door or adding a soundproof curtain can keep your noise from disturbing others.
Understanding these distinctions helps you prioritize your efforts. If your main issue is external noise, focus on soundproofing. If the problem is echo and harshness inside your space, target acoustic treatment. Often, a hybrid approach yields the best results: sealing gaps and adding targeted absorption materials creates a balanced environment that’s both quiet and acoustically controlled.

Professional Studio Recording Microphone Isolation Shield, Pop Filter,High density absorbent foam is used to filter vocal. Suitable for Blue Yeti and other condenser microphones (AO-504 With Stand)
- Package Includes: Isolation shield, adapters, stand, manual
- Adjustable Height: Height can be freely adjusted
- Effective Sound Filtering: Absorbent cotton interior for clarity
As an affiliate, we earn on qualifying purchases.
As an affiliate, we earn on qualifying purchases.
Best Mic Placement Tips to Capture Clear Sound in a Closet
Mic placement is about finding the sweet spot—away from walls, yet close enough to capture your voice or instrument clearly. The general rule: position the mic 6-12 inches from your mouth, angled slightly downward or sideways to reduce proximity effect and plosives. Proper microphone placement is essential for clear recordings.
In a closet, avoid placing the mic directly against a wall or corner, as these surfaces can cause sound reflections that muddy your recordings. Instead, set it on a boom arm, slightly off-center, and use a pop filter. Adjusting the mic angle and distance can significantly reduce reflections and unwanted reverb, making your recordings sound more professional.
Real-world example: a streamer in a closet found that moving the mic 8 inches from her mouth and covering the wall behind her with a blanket reduced echo by 40%. This demonstrates how small adjustments in placement and absorption can have a big impact on sound clarity, especially in reflective environments. Testing different positions helps identify the optimal setup tailored to your space and voice.

Windigaga 8 Inch Shutter Exhaust Fan, 760 CFM High-Speed Wall Mounted Exhaust Fan, 40dB Quiet Cooling Ventilation Attic Fan for Shed, Garage, Greenhouse, Basement, Chicken Coop, Generator Room, Black
- Size: 8-inch exhaust fan for efficient airflow
- Airflow Capacity: 760 CFM for fast cooling
- Quiet Operation: Below 40 dB noise level
As an affiliate, we earn on qualifying purchases.
As an affiliate, we earn on qualifying purchases.
Where to Treat Walls, Doors, and Corners First
Prioritize treating the surfaces that cause the most reflections—mainly walls, the door, and the ceiling. Hard, flat surfaces reflect sound waves, creating echo and muddiness. Focusing on these areas first ensures maximum reduction in unwanted reverberation and improves overall sound clarity. Targeted treatment of reflection points is key.
Start with the wall behind your mic and the ceiling directly above. Cover these with thick blankets, foam, or acoustic panels. The door is often overlooked but is critical—seal gaps with weatherstripping, and add fuzzy blankets or foam around the edges. This prevents sound from bouncing back into your recording area and reduces noise leakage.
In a typical closet, a combination of foam panels on the back wall and a thick blanket over the door can cut reverb by 60%. This targeted approach addresses the primary reflection points, which are responsible for the most echo and muddiness, making your recordings clearer and more focused.
Low-Frequency Troubles? How to Handle Bass Buildup in Tiny Spaces
Low-end buildup is a common issue in small rooms. Standing waves can make your voice sound boxy or boomy, which is especially problematic in tight spaces like closets. The fix? Bass traps and low-frequency treatment are essential for a balanced sound.
Imagine a closet with a standing wave causing a muddy, muffled sound. Adding a bass trap in the corner where the wall meets the ceiling can reduce that boom by half. The placement is crucial: corners and junctions are where low frequencies tend to accumulate, so targeting these spots yields the most noticeable improvement.
Current trends include DIY bass traps made from rockwool or Owens Corning insulation, layered behind the main treatment. If your voice sounds hollow or low frequencies dominate, this is your best bet. Properly addressing low frequencies prevents the muddiness that can obscure your vocals and instruments, ensuring a cleaner, more balanced sound.
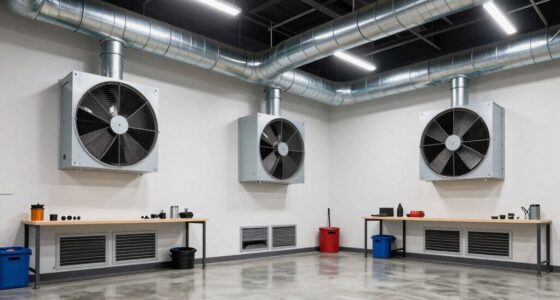
Keeping Your Rig Cool in a Closet: Ventilation Tips
Putting a powerful, heat-generating machine in a closet is a recipe for overheating. The key is ventilation. Passive vents help, but active exhaust fans are better. They draw hot air out and pull in cooler, fresh air, preventing heat buildup that can damage equipment or cause noise issues.
For example, a DIY closet booth with a small fan in the door vent kept the temperature stable even after hours of heavy use. Without airflow, temps soared, causing fans to spin faster and noise to spike. Proper ventilation not only protects your gear but also helps maintain consistent performance and prevents thermal shutdowns.
Check out [this guide](https://thorstenmeyerai.com/reduce-heat-noise-ai-workstation/) for detailed cooling tips, including ducting, thermostatic control, and fan placement. Ensuring good airflow is critical for long-term reliability, especially when running intensive processes or high-power equipment in confined spaces. Good ventilation reduces the risk of overheating, prolongs equipment lifespan, and keeps noise levels manageable.
Frequently Asked Questions
Is a closet enough for a good recording booth?
Yes, if you treat the space properly. Focus on reducing reflections with blankets, foam, and sealing gaps. For vocal work, a well-treated closet can sound as clear as a professional booth—without the hefty price tag.
What’s the difference between soundproofing and acoustic treatment?
Soundproofing blocks sound from escaping or entering a space—think thick walls or sealed doors. Acoustic treatment manages sound inside the room, reducing echo, reverb, and harsh reflections. Both help, but serve different goals.
Where should I place the microphone in a closet setup?
Place your mic about 6-12 inches from your mouth, slightly off-axis from walls. Aim for the reflection points—usually the wall behind you and the ceiling—to minimize echo. Use a pop filter and test different positions for best clarity.
Do I need bass traps in a tiny closet?
If your voice sounds boomy or hollow, yes. Bass traps placed in the corners can absorb low-frequency standing waves, giving you a cleaner, more natural sound. DIY traps with rockwool or foam work well and are budget-friendly.
Conclusion
Transforming a closet into a quiet, clear workspace isn’t about sealing every crack or piling on foam. It’s about smart placement, targeted treatment, and managing heat so your gear can breathe. When you treat the room’s reflection points and keep your rig cool, you turn a noisy mess into a professional-quality space.
Next time you think about soundproofing, remember: distance and placement often beat layers of foam. Your best soundproofing is a door, a blanket, and a little strategic thinking. After all, the quietest studio is the one you rarely see, but always hear—clear, warm, and well-placed.